Jekyll + NexT + GitHub Pages 主题优化
设置主题风格
打开 文件,找到 scheme 相关配置内容,去掉启用主题前的 # 注释即可
# ---------------------------------------------------------------
# Scheme Settings 设置主题
# ---------------------------------------------------------------

# Schemes
#scheme: Muse   # 默认 Scheme,这是 NexT 最初的版本,黑白主调,大量留白
#scheme: Mist   # Muse 的紧凑版本,整洁有序的单栏外观
scheme: Pisces  # 双栏 Scheme
设置菜单项的显示文本和图标
NexT 使用的是 Font Awesome 提供的图标, Font Awesome 提供了 600+ 的图标,可以满足绝大的多数的场景,同时无须担心在 Retina 屏幕下图标模糊的问题。
设置菜单项的显示中文文本
打开 /_data/languages/zh-Hans.yml 文件,找到 menu 菜单,新增或者修改菜单项
menu:
  home: 首页
  archives: 归档
  categories: 分类
  tags: 标签
  about: 关于
  search: 搜索
  schedule: 日程表
  sitemap: 站点地图
  commonweal: 公益404
  # 新增menu
  book: 书单
设定菜单项的文件目录和对应图标
打开 _config.yml 文件,搜索 menu 关键字,修改对应图标名称或者新增对应 menu 的图标。
# ---------------------------------------------------------------
# Menu Settings
# ---------------------------------------------------------------

# When running the site in a subdirectory (e.g. domain.tld/blog), remove the leading slash (/archives -> archives)
## 这里添加或修改menu目录
menu:
  home: /
  categories: /categories/
  about: /about/
  archives: /archives/
  tags: /tags/
  #sitemap: /sitemap.xml
  #commonweal: /404.html


# Enable/Disable menu icons.
# Icon Mapping:
#   Map a menu item to a specific FontAwesome icon name.
#   Key is the name of menu item and value is the name of FontAwesome icon. Key is case-senstive.
#   When an question mask icon presenting up means that the item has no mapping icon.
# 这里启用相应的FontAwesome图标
menu_icons:
  enable: true
  #KeyMapsToMenuItemKey: NameOfTheIconFromFontAwesome
  home: home
  about: user
#  book: book
#  note: pencil
  categories: th
  schedule: calendar
  tags: tags
  archives: archive
  sitemap: sitemap
  commonweal: heartbeat
#  myseo: internet-explorer
#  top: signal
#  resume: handshake-o
#  message: commenting
#  friends: link
#  file: file-archive-o
# ariang: cloud-download注意:除了
home,archives,/后面都需要手动创建这个页面对应的文件夹及文件,且文件需要以index.md命名
头像设置
添加头像
打开 /_config.yml 文件,搜索 Sidebar Avatar 关键字,去掉 avatar 前面的#,并添加相应的图片链接或者文件路径:
# Sidebar Avatar(侧栏头像)
# in directory: /assets/images/avatar.gif
avatar: /assets/images/avatar.jpg
设置头像边框为圆形框
打开 /_sass/_common/components/sidebar/sidebar-author.scss 文件,修改如下:
.site-author-image {
  display: block;
  margin: 0 auto;
  padding: $site-author-image-padding;
  max-width: $site-author-image-width;
  height: $site-author-image-height;
  border: $site-author-image-border-width solid $site-author-image-border-color;
 // 修改头像边框
  border-radius: 50%;
  -webkit-border-radius: 50%;
  -moz-border-radius: 50%;
}
特效:鼠标放置头像上旋转
打开 /_sass/_common/components/sidebar/sidebar-author.scss 文件,修改如下:
.site-author-image {
  display: block;
  margin: 0 auto;
  padding: $site-author-image-padding;
  max-width: $site-author-image-width;
  height: $site-author-image-height;
  border: $site-author-image-border-width solid $site-author-image-border-color;
 // 修改头像边框
  border-radius: 50%;
  -webkit-border-radius: 50%;
  -moz-border-radius: 50%;
  // 设置旋转
  transition: 1.4s all;
}
// 可旋转的圆形头像,`hover`动作
.site-author-image:hover {
    -webkit-transform: rotate(360deg);
    -moz-transform: rotate(360deg);
    -ms-transform: rotate(360deg);
    -transform: rotate(360deg);
}
浏览页面的时候显示当前浏览进度
打开 /_config.yml ,搜索关键字 scrollpercent ,把 false 改为 true。
# Scroll percent label in b2t button
  scrollpercent: true
如果想把 top按钮放在侧边栏,打开 /_config.yml ,搜索关键字 b2t ,把 false 改为 true。
# Back to top in sidebar
  b2t: true

  # Scroll percent label in b2t button
  scrollpercent: true
侧边栏设置
社交链接
打开 /_config.yml 文件,搜索关键字 social ,然后添加社交站点名称与地址即可。
# ---------------------------------------------------------------
# Sidebar Settings
# ---------------------------------------------------------------


# Social Links
# Key is the link label showing to end users.
# Value is the target link (E.g. GitHub: https://github.com/iissnan)
#social:
  #LinkLabel: Link
social:
  CSDN: https://blog.csdn.net/yourname
  GitHub: https://github.com/yourname
社交链接图标
与菜单栏的设置类似,打开 /_config.yml 文件,搜索关键字 social_icons ,添加社交站点名称(注意大小写)图标,Font Awesome图标地。
# Social Links Icons
# Icon Mapping:
#   Map a menu item to a specific FontAwesome icon name.
#   Key is the name of the item and value is the name of FontAwesome icon. Key is case-senstive.
#   When an globe mask icon presenting up means that the item has no mapping icon.
social_icons:
  enable: true
  # Icon Mappings.
  # KeyMapsToSocialItemKey: NameOfTheIconFromFontAwesome
  GitHub: github
  Twitter: twitter
  Weibo: weibo
RSS设置
当前 Next 主题好像可以直接使用RSS,可以在 /_config.yml 文件中搜索 feed 添加如下配置:
# Atom feed
feed:
  path: atom.xml
友情链接
打开 /_config.yml 文件,搜索关键字 Blog rolls:
# Blog rolls
links_title: 友情链接 #标题
links_layout: block #布局,一行一个连接
#links_layout: inline
links:
  Title: http://example.com/
主页文章添加边框阴影效果
打开 /_sass/_custom/custom.scss ,向里面加代码:
// 主页文章添加阴影效果
.post {
   margin-top: 0px;
   margin-bottom: 60px;
   padding: 25px;
   -webkit-box-shadow: 0 0 5px rgba(202, 203, 203, .5);
   -moz-box-shadow: 0 0 5px rgba(202, 203, 204, .5);
}
代码块自定义样式
// Custom styles.
code {
    color: #ff7600;
    background: #fbf7f8;
    margin: 2px;
}
// 边框的自定义样式
.highlight, pre {
    margin: 5px 0;
    padding: 5px;
    border-radius: 3px;
}
.highlight, code, pre {
    border: 1px solid #d6d6d6;
}
开启版权声明
主题配置文件下,搜索关键字 post_copyright , enable 改为 true
# Declare license on posts
post_copyright:
  enable: ture
  license: CC BY-NC-SA 3.0
  license_url: https://creativecommons.org/licenses/by-nc-sa/3.0/
在右上角或者左上角实现fork me on github
可以在GitHub Ribbons选择不同的样式,修改图片跳转链接,并复制文本框中的代码,将如下地方代码换为自己Github主页:
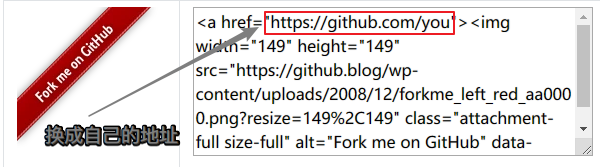
打开 /_layouts/layout.html 文件,把代码复制到 <div class="headband"></div> 下面。
修改内容区域的宽度
打开 文件,新增变量:
// 修改成你期望的宽度
$content-desktop = 700px

// 当视窗超过 1600px 后的宽度
$content-desktop-large = 900px
此方法不适用于 Pisces Scheme
当你使用Pisces风格时可以用下面的方法:
编辑 Pisces Scheme 的 文件,在最底部添加如下代码:
header{ width: 90%; }
.container .main-inner { width: 90%; }
.content-wrap { width: calc(100% - 260px); }
对于有些浏览器或是移动设备,效果可能不是太好
编辑 Pisces Scheme 的 文件,修改以下内容:
// 将 .header 中的
width: $main-desktop;
// 改为:
width: 80%;

// 将 .container .main-inner 中的:
width: $main-desktop;
// 改为:
width: 80%;

// 将 .content-wrap 中的:
width: $content-desktop;
// 改为:
width: calc(100% - 260px);